Showing posts with label corset construction. Show all posts

Thursday, 19 December 2013

My first sheer corset experiments

So, in my last post I did a bit of background on sheer corsets, and identified some materials and idea's I am experimenting with. To read my last post click here: Sheer Indulgence

I have finished my first experiment with organza, and I am pretty pleased with it. Here it is with the panniers I finished yesterday. I shall be exploring the idea's of panniers in another post, but for a bit of light reading on bustle concepts (not too far removed from panniers) here is a previous post Bustle Cage Action if you can't wait for me.


To recap...this corset was made with two layers of silk organza with bone casings and trimming made from silk dupion, which is one of my favourite fabrics to work with. As I was in full experimentation mode I decided to use flat steel in all the bone casings and heat mould them in to shape rather than using spiral steel. 

After I finished my piece I decided to go 'hell for leather' and lace it as tight on the dummy as I would with a corset made from more traditional materials. My expectation was I could identify any weak points in the materials, but to my surprise there were no obvious weak points where the fabric has frayed away from the stitching. Fabulous!

In real terms I think that a transparent corset made with organza would not be suitable for daily use or prolonged tight lacing, but it has produced a very light and beautiful corset that I am very pleased with.

Tuesday, 9 October 2012

New things: Halloween corsets and new shoots

Here I go again, typing away after a hard days work with Downton Abbey on in the background. That's how I have spent the last few evenings and I'm sure a few more are in my near future....

There are many new things on the horizon, and it is very exciting. Only yesterday I was planning two photo shoots with the shy and talented Andrew Loader, a superb photographer. One with the infamous Peacock train and the other with the flamenco skirt I have blogged about previously.

Tonight I find myself designing my next corset outfit to wear out. I will be using a fabulous pillar box red piece of leather that I have been hoarding for years and be pinking black leather and making some beautiful brogue appliqué. I am jumping making the C2 historical re-make, and diving straight into making a modern interpretation instead.

Sketchbook excerpt:
I started to draw the pattern out on top of a size 12 block and let my intuition guide me as to the pattern cutting. When I start to create new seam lines on a new corset block I always find it is useful to begin by cutting out the pattern paper and pinning it on the size 12 dress form to have a look at the general lines to see if they work in 3D as well as I had seen them in my mind.

 Hurrah! Pretty good! I made some adjustments to the pattern whilst it was on the form and then decided to cut it in calico and just go for it.


As you can see there is some fabric stretching and straining that needs some attention, and I feel that if I am to wear this corset it will need more room in the bust...but they are problems to be solved another evening.


Friday, 5 October 2012

Corset analysis research C2, 4th Oct2012

Yesterday I went to view 4 corsets of the Symington Collection at Leicestershire Museums resource centre.

I had specifically chosen to view the French plunge front corset C2 that I  discussed in a previous post: French Plunge corset 1905. As discussed in my previous post I would like to recreate this corset, but after examining the corset I feel that I may have to modify the original design to accommodate a larger bosom that the original corset would do. I discussed this particular design with the corset expert Sarah Nicol and we both agreed that the design must flatten the bust considerably as there is little shaping in this area. I am now torn between making a modern version using more allowance in the bust or create a straight re-make.

Decisions, decisions.

Besides that particular conundrum, here is some of my research for all you corset buffs should you want to follow my progress...


So, this is the C2. Isn't she beautiful?

Apart from the gorgeous plunge front it has some more notable details such as the unusual busk in which each 'hook' is different from the last. On closer inspection you will notice that the top and middle 'hook' are pointing away from each other whilst the bottom one is fully closed. It has two beautiful frilled elasticated suspenders which are very pretty. 

I love the filigree look to these suspender regulators.
And just look at all that work on the inside!!!

The boning was most concentrated on the front part of the corset, from the side backwards there was only one thick bone per seam but at the front there are at least eight bones that support the front. The other thing that struck me with this corset is how light it is. It is made of only 2 layers, of reasonably light fabrics: cotton satine and cotton twill.


Also of note, in terms of the silhouette, the hip ratio is very generous....which leads me to conclude that this corset was not designed to alter the hipline, but mainly to create a tiny waist and thrust the bust up to the front. This is further supported by the diagonally crossing bones at the side bust which probably attempt to force the breasts foreward away from the underarm.

 The label forms part of the waistband and is present only from the side seam to the back lacing facing.


This corset (above) is made to the same pattern from the same company, but is made from a damask style cream broche. All the boning has been removed from one whole side which makes drafting the pattern easier. Although, it is almost impossible to discern the true pattern piece shapes without taking it all apart and drawing round them it does make my job a little easier.

I'm very much looking forward to giving this corset a crack, promising the wonderful Sarah Nicol that I would send photo's of it actually being worn since a great deal of our conversation concerned the merits, or lack thereof, of the pattern cutting and bone shaping in the front.

I will not know until I make it....that much is for certain.

Saturday, 17 March 2012

Toille to construction

After my last client left at 4pm today I have been working on my designs for London Alternative Fashion Week. Just over a month to go! Excitement.

Since I'm finding it hard to find the time to blog everyday as my workload increases I am resolved to try and create a snapshot of each day as my countdown begins, so here I start with one of my bridal designs.

I left this corset toille last night on the stand ready to bury my head in it today.

Corset in ivory silk after alterations

corset as designed to be worn over a full skirt, still needs a few tweaks but all looking good.

Tuesday, 17 January 2012

Snap shots of life

It's been a day of mischief and mayhem. The clock is ticking on me to get my collection ready for Alternative Fashion Week in April, but sometimes it's really important to take time out for other just as important things. So today I've spent some time out with my little boy Riley, which has been great.


So here he is, enjoying the fruits of my labour. He looks rather fetching...maybe I should make baby forage hats. This little nipper never sits still, believe it or not this is the best photo of him today. He's also wearing a fetching jumper designed and made by my mum.

This evening I have got back to the grindstone getting on with my TG corset. I have graded the pattern to my size, slightly adapted the shape more like my sketch and started cording the hip panels. So far I have got through a good six metres of piping and I've just run out so another trip to the shops tomorrow!

This style of cording is similar to the one I employed to make 'The Pretty Housemaid', it's gonna take a while.

Cording...it takes some time...

Thursday, 12 January 2012

Consolidation

Now I have this major problem: I am aware of it...but only sometimes do it manage to regulate it. That I work on so many different projects that in a cursory glance it is hard to discern progress.

But today I feel progress is a force in my life:

I have now boned the Edwardian corset I have designed and made for AFW catwalk show it is my sincere desire to finish that corset before bedtime.

To get the bone casings down I ended up doing far more process than I had anticipated. In this style of corset it would be made out of only one layer of fabric and bone casings in the same colour could be sewn through from the back.  However, this corset is made from three layers:the top layer being very thin and likely to drag on the machine teeth if I sew from the back. So first they had to be basted in through all layers and sewn from the front, it was a bit troublesome, some of it still needs tweaking but yielded great results from the top layer.

I'm still in two minds about if and how to decorate this corset...as my indecision as to whether this is a showpiece or will become part of the collection.

Friday, 6 January 2012

Beauty and strength: construction notes

So today is all about getting on with my Edwardian style corset in peach satin and black lace...

The busk is in, that's the metal hook and stud closure at the front of a corset, and the boning is in the back. There is a special bow detail I want to put in the waist so I have just basted the rest of the corset together to give an idea of the final shapes.

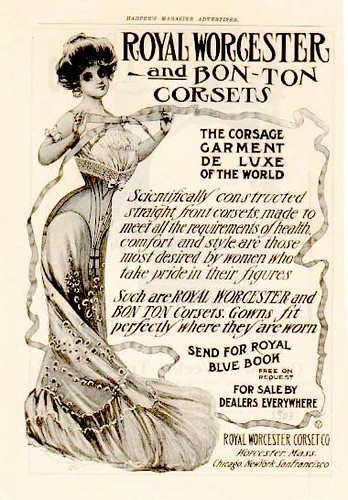
Edwardian corsets are my favourite of all the corset styles, and they are also the most extreme and highly engineered. Most of my newest designs are based on Edwardian features. This is a typical advertisement of the time:
As you can see the features of this period are a prominant bosom and bum, tiny waist and a tipped forward stance, more commonly defined as the S-bend. Seamlines are diagonal, curved and complex, whilst boning was positioned mostly vertical. I don't plan on staying entirely historically accurate because my intention is to make a wearable corset that won't cripple my customers whilst still bearing the design features that I like the most about this period of corsets.

So, to recap my progress with this corset:


I have previously made a corset, based on Edwardian features to test construction and pattern fit: It doesn't fit on the tailors dummy entirely correctly because a dummy is not soft and pliable like a real body.

From this successful design I have changed my pattern to the new design and begun construction. This peach broche corset is a single layer corset, similar to Edwardian ones, and is strong enough on it's own to withstand much wear...but the materials I am making the new corset out of are not, so I am having to build a seperate outer and inner layer...which is problematic just from the point of view of matching up all 40odd seams but also that the seams cannot become bulky even though they have 6 layers of fabric in them.

This is fabric engineering!

So this is where I am now at:

It is coming along very nicely, just have to wait for my delivery of black silk so I can finish it off, yippee!

If any of you are thinking of trying to make this style it is definatly one of the most rewarding things to do and I have a few tips to make your life a bit easier that I found out as I was going along. I'll be doing a propper construction blog on this style of corset when I have a bit more time to properly devote it, but anyway in the mean time my quick advice tips are:

  • double stitch all seams
  • reinforce potential weak points
  • use the correct boning
  • build in a waist stay

Friday, 30 December 2011

A step closer to product

Here I am again, I think if I write up what I did in the morning it's more likely to get done!

Yesterday was a mixed up bag of work, I had clients work to do all day so I didn't really get going on my AFW collection until about 8pm after Riley (my baby) had gone off to sleep.

I really want to do a fan lacing corset in my collection this year, and it being the most unknown to me...it is the first one I am tackling. I have talked about fan lacing corsets in a previous blog beauty-of-fan-lacing if you want to refresh your memory. I have previously made a long line corset that I am basing the pattern on, so the first thing I do is tweak the pattern to acheive the size and shape that I want. As always I have my sketch to guide me.


I am making this corset to go with the neck corset I finished yesterday, so it will follow similar stylelines and use the same fabric.

Although I didn't get much of the construction done, I have also been thinking about details and decoration, and looking through my archive of fashion books I have been delving into 50's couture for inspiration...I found a particularly amazing use of applique lace which I intend to utilise on a dress by Michael Sherard made in 1958.

I adore the detailing of this dress, it is so simple and so effective and it totally works with the styling I have in mind for Fleurs Du Mal. So I will use that as my basis and move on from there. So here was my work from yesterday as it now stands in my workshop.


Tuesday, 26 July 2011

Pretty Housemaid - construction notes

This corset is a labour of love, honestly...if you don't have patience this one is going to be a chore!

Being unfamiliar with this construction of corset I am constantly referring to my notes and photo's.

My initial research into construction led me to a problem with cording. I had initially used the smallest piping cord I could buy to do the cording, but after doing some sampling I realised that it is far too crude to be appear like the cording on the original corset. When I measured the width of the cording it was only about 3-4mm wide, almost half what I had been trying...and the results look less refined compared to the real thing. So - start again, this time using Russian Braid and sewing either side of it and in it's ditch...this is about right now, but still not entirely satisfactory. If I attempt to do this corset again I will be trying it with austrian blind cord which is very dense and very thin because the russian braid is making the cording look too flat. I am going to finish this corset as is and have a good look at it's shape before I think about starting the next one.

Just completed the hip section, which is the heaviest corded piece.Now I know why they had machines with  multiple rows of needles to do all this blasted cording! It is taking an age! They had special machines that did the cording all in one shot with some machines with up to 12 rows of needles all going at it. I really like the look of cording, but with only normal sewing machines it is very time consuming. I told ya....a labour of love it is!

It's starting to really come together now. The seams that contain the bones look as if they are jean seamed on top and lining fabrics so I'm now wondering if each piece was corded after being stitched to the last seam as the corset was being made. Maybe I will try that next time I give it a go also. Although on the real thing the evidence is that the boned seams are made from french seaming I will have to use casings on the inside as the corset is getting pretty difficult to manipulate with all the hessian interlining and piping to contend with. Although now historically inaccurate I feel that I am willing to accept the compromise. The good news is that it's going to be incredibly strong.

I have also decided that upon my attempt to dye cotton lace it is nigh on impossible to get a good colour match, so instead of it looking a bit off I am instead going to use black, and continue to use black as the detailing colour rather than the original blue, another deviation from the original.

The flossing now done, and cotton lace procured, albeit narrow, here are the results of the pretty housemaid...


Related Posts Plugin for WordPress, Blogger...